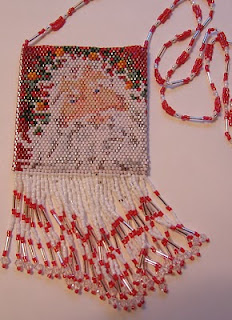
I mentioned off-loom beading as one of my interests and several people have asked me what was. Off-loom beading is making a solid beaded object without the use of a beading loom. I'm not sure that is the "official" explanation but that is what I think it is.
Several years ago some friends and I were fortunate enough to take a class from a serious beader and I made some needle cases and then moved on to what are called amulet bags. They are small bags worn as a necklace. I think I ended up making five of them. The one shown in the photograph was for a special friend of mine, Sharry. They are done with Delica beads and are sort of, I guess, tedious to do but fun if you like fussing with little things.
The second photo is one of the needle cases, also worn as a necklace. The beading is done and then fit over a purchased wooden needle case in two pieces (the top and bottom) and then the fringe is applied.
You do the work with very thin needles and a special type of thread. You work from a graph or a chart.
Monday, August 30, 2010
Sunday, August 29, 2010
Sewing a LOT and a Few ATC's
I would post a picture of the sewing but it is pretty boring. Made ten black aprons that are now done and ready to decorate and I also shortened six T-shirts that are also ready to decorate. Am anxious to do some more playing around with the heat transfer vinyl. Found a video that showed using an airbrush and Copic markers to color the vinyl. I know it is washable as I had colored on some vinyl with the markers and then threw the shirt in the wash and it all stayed just where I'd scribbled. Luckily, I do have an airbrush and Copic markers...what a happy coincidence!! I will be posting my results when I get some time to play with the method.
Did find time, however, between stitching and pressing to make a few ATC's. Here are some samples. Have almost 100 done now so I am getting closer to my goal of 140.
My other goal is to get a decent picture to put on my profile. Several people guessed that I held the camera as far as my short arms would reach and snapped the picture I am using now. Know it is pretty awful but I will be replacing it soon.
Friday, August 20, 2010
Heat Transfer Vinyl Adventures

I am finally getting around to playing with vinyl. I cut my name and my old business name with no plan so stuck them on file cabinets. Today I did a larger version of my business name (Whimsey Unlimited) and put it on the door to my shop.
BUT...the exciting thing was playing with the heat transfer vinyl for fabric. A couple of days ago I did my first effort and decided to iron it right to my new Tim Holtz apron. It worked great but I did not use parchment paper or what I should have while I heat set it. When I lifted up my iron the vinyl was nicely transferred and it was framed with a wonderful brown iron shape where the heat had scorched the apron. It took me several hours of fooling around to disguise the scorch with some artsy stuff.
Today I tackled a T-shirt. I took one of Tim Holtz's stamps and stamped it on paper, scanned it, traced it in Illustrator and exported the file as an SVG file to cut on my Cricut with the Make-the-Cut program. It worked fabulously. The photographs are of the design. The black background is a T-shirt and the design is about 8" wide. The tan background is a pocket on my apron and the design is about 5" wide and has a stamped image to the left of it. I am so excited about the possibilities. I even made a quick trip to Walmart to purchase T-shirts and they are piled in my office awaiting something clever to be done with them. I told my husband he better guard his drawer full of T-shirts or I'd be experimenting on his shirts.
Monday, August 16, 2010
Cruise Door Sign
Got the door sign finished for the cruise and it turned out pretty much like I had pictured it. There are six "activities" that the "Artful Sisters" could be engaged in. We can turn the sign to reflect our current activity. I even got the magnets glued on the back so it will stick on our door. Hmm...now it must be time to get back to making more ATC's to trade.
Not sure but think the picture of the two of us was taken around 1957 or 1958. Used lots of Tim stuff on the sign including grunge objects, Distress Stickles and an Ideology flower with Distress Embossing and even an Ideology gear and tag. Just remembered I also used a calendar from one of his paper stacks and, of course, some of his stamps. The lettering was cut out on a die cut machine.
Not sure but think the picture of the two of us was taken around 1957 or 1958. Used lots of Tim stuff on the sign including grunge objects, Distress Stickles and an Ideology flower with Distress Embossing and even an Ideology gear and tag. Just remembered I also used a calendar from one of his paper stacks and, of course, some of his stamps. The lettering was cut out on a die cut machine.
Sunday, August 8, 2010
Baby Quilt Finally Done and Ready to Mail
I started this baby quilt before my friend Diane's daughter got married. I knew I wouldn't put this much work into a baby quilt for anyone but her and her baby. Amazingly she has been married a little over a year and is due to have a baby in the next week or so. I worked on the quilt for several months and then it took a long time to get it quilted but it's ready to mail. The applique is all held in place with hand applique blanket stitching. Much brighter than my usual quilt projects but I really liked it.
Now I just have to find a box, some paper, and think of some creative way to wrap it up.
Now I just have to find a box, some paper, and think of some creative way to wrap it up.
Thursday, August 5, 2010
Halloween and a Cricut
Saw this weird pumpkin on the Cricut Holiday Cakes cartridge and knew it was perfect for Halloween cards. I will admit I cut a few before I got the size right and got it cutting well...but I cut them out and made these (very similar) cards using the pumpkin and the shadow for it. I'm working on more Halloween cards along with getting things ready for August card classes. Always fun to play with paper.
Tuesday, August 3, 2010
Felt Frenzy
Was thinking the other day that I would need a jacket for the upcoming cruise and thought about making one. I pulled out all my quilted jacket patterns but nothing really seemed like something I wanted to make. Then I remembered the absolutely plain black quilted jacket I made when I went to Europe with my friends about six years ago. I found it buried in a closet and decided to spruce it up with felt flowers all around the bottom edge. All of the flowers were cut with Sizzix dies and the leaves and stems were cut by hand. I pinned everything in place and then had a marathon three days of doing blanket stitch and then selecting buttons from my huge stash to put in the centers. I'm now thinking I wish it looked a little more "grungy" or something...but it's done and that counts for something. This photo is of the bottom front but the flowers go all the way around the back too. I also added a small flower on one side of the collar. Felt flowers seem to be a hot new embellishment for cards and scrapbook pages. The Sizzix dies cut it beautifully and I think I'll be making more flowers to put on cards.
Subscribe to:
Comments (Atom)


